
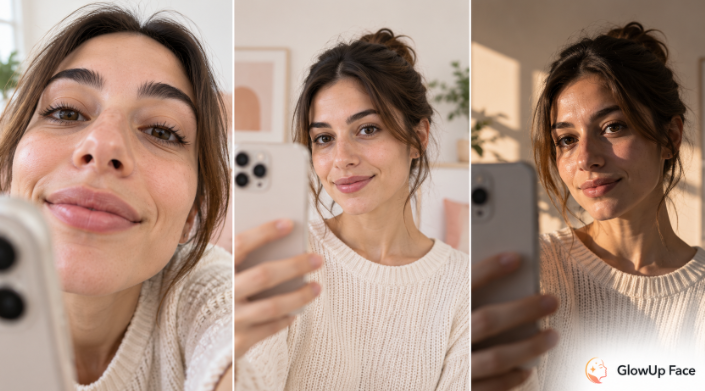
Two phone photographs taken minutes apart can make the same face look surprisingly different. The nose may seem more prominent in one, the hair flatter in another, and the skin more textured in a third. Before deciding which image reveals the truth, check whether the camera was asking the same question each time.
Three variables are especially useful to separate: distance, light and processing. Change them individually and you can see which part of the picture responds. This is a practical photography exercise, not a test of attractiveness or a way to diagnose your skin.
Distance changes the relationship between features
A camera records a three-dimensional face from one position. Features closer to it are projected differently from features farther away. Moving the camera very close increases those relative differences. Cropping a photograph afterward changes the frame, but it does not recreate a photograph taken from another position.
The study Nasal Distortion in Short-Distance Photographs: The Selfie Effect modeled how short camera distances change the apparent size of the nose relative to facial width. It supports a point about perspective, not a universal claim that every selfie enlarges every face by a fixed amount. It also does not tell you which portrait you should prefer.
For your own comparison, keep the camera at eye level and use the same lens or camera setting. Take one image at your usual close distance, then place the phone farther away on a stable support and use a timer. Crop the farther image to similar framing afterward. Expect the available detail to differ if you crop heavily; this is a perspective demonstration, not a resolution benchmark.
Do not confuse zoom with moving the camera
A longer focal-length setting often leads photographers to stand farther away to preserve the framing. It is that changed viewpoint that changes perspective. Merely selecting a different zoom setting without moving does not reproduce all the effects of taking the photograph from farther away.
Phones complicate this because zoom options may involve different cameras, digital cropping or image processing. You do not need to reverse-engineer the device to make a fair comparison. Choose one ordinary camera setup, record where it was placed and avoid mixing photographs from different settings without labeling them.
If a test image looks worse because it is blurry or severely cropped, repeat it in better light rather than concluding that a certain distance makes your face look a particular way. Compare reasonably sharp photographs at the same displayed size, not one full-resolution file with a tiny screenshot.
Light changes which surfaces attract attention
For the second test, leave the phone and your head in the same positions. Compare broad, even light with light arriving more strongly from one side. Notice where shadows, shine and texture become more visible. You are watching the interaction between a surface and a light source, not evidence that the surface changed during the test.
The American Academy of Dermatology’s photography advice emphasizes focus and lighting that clearly represents visible colors and textures, avoiding harsh shadows and glare. For an ordinary reference portrait, apply that principle by choosing a repeatable setup rather than automatically choosing the most dramatic light.
A window can provide useful light, but it is not a fixed studio source. Weather, time and your position relative to it can change the result. Make a note of those conditions. Keep makeup and freshly applied skincare consistent if the purpose is to compare the appearance of skin rather than the finish of a product.
Processing changes the saved picture too
A phone photograph is not simply untouched light recorded by a sensor. The device can alter the output before you open an editing app. Apple’s advanced camera settings guide documents features such as Lens Correction on supported models and settings that change processing behavior. Exact options vary by phone and software.
For the third test, compare original files from your usual camera app with versions produced by another app or an optional effect. Keep the capture conditions as close as practical and label the processing difference. Do not assume that a sharper-looking image contains a more accurate account of every pore or fine hair.
For ongoing comparisons, choose one mode and leave beauty effects off. Save the original file, not only a social-media download. A heavily processed image can be a valid creative portrait; it is simply a poor reference for a comparison intended to isolate a small physical change.
Treat skin texture as part of the photograph
When a particular selfie makes pores or shine look conspicuous, start with the capture conditions. GlowUpFace’s guide to pores looking bigger in photos includes a photo-condition check and a repeatable retake method. It is a useful next step for this specific question, not a claim that a phone can measure pore anatomy or establish a medical cause.
A texture pattern that appears under one lighting setup may disappear under another. That does not make either photograph fake. It shows why a single image is insufficient to explain what a product did or why your skin looks different. Keep photographic observations separate from explanations about your body.
Choose a reference and stop testing
Finish by selecting a setup you can comfortably repeat: one camera, one position, one lighting arrangement and one mode. Keep a simple note, then use it when you have a genuine reason to compare photographs. You do not need to recreate a laboratory or take dozens of pictures every day.
The exercise succeeds when it makes the image easier to understand. There is no single phone photograph that reveals your definitive face, and no need to keep searching for one. Once you know which variables changed, you can use portraits for communication, creativity or a practical reference without treating every unfamiliar image as a problem to fix.